Thursday, 30 March 2023

HTML Tags, Elements, and Attributes


HTML consists of tags, elements, and attributes.

Tags:
Tags are used to define the structure and content of the web page. They are placed around the content they apply to and indicate what that content is. Tags are enclosed in angle brackets <>. Some examples of tags are:

  • <html>: This tag indicates the start of an HTML document.
  • <h1>: This tag is used to create a top-level heading.
  • <p>: This tag is used to create a paragraph.

Elements:
An element is a combination of one or more tags that work together to create a particular function or feature. An element can be made up of one or more tags and the content between them. Some examples of elements are:

  • <html></html>: This element contains all the HTML content of a webpage.
  • <h1>Welcome to my website</h1>: This element contains a top-level heading with the text "Welcome to my website".
  • <p>Some text here</p>: This element contains a paragraph with the text "Some text here".

Attributes:
Attributes provide additional information about an element, and they are used to modify the behavior or appearance of that element. Attributes are added to the opening tag of an element and are written as name-value pairs separated by an equals sign. Some examples of attributes are:

  • <a href="https://www.example.com">Example</a>: 

  • This element contains a hyperlink with the text "Example" and the href attribute specifies the URL that the link should go to.

  • <img src="image.jpg" alt="Description of the image">: 

  • This element is an image with the src attribute specifying the location of the image file, and the alt attribute providing a description of the image for accessibility purposes.

So, in summary, tags define the type of content while elements are the combination of one or more tags and their content. Attributes provide additional information about an element, modifying its behavior or appearance.

Here's an example of how tags, elements, and attributes can be used together in HTML code:

<!DOCTYPE html>
<html>
<head>
<title>My Webpage</title>
</head>
<body>
<h1>Welcome to my webpage!</h1>
<p>This is some text on my webpage.</p>
<a href="https://creative-codz-html.blogspot.com/2023/03/
introduction-to-html.html">Click here to go to Blog</a>
<img src="frozen.jpg" alt="Frozen image">
</body>
</html>

output


Here I have given blog link, whenever we click on the link it will navigate to the blog.

Projects

1. Create a webpage about your favorite place
Create a webpage about your favorite place using appropriate HTML tags to structure the content. Include at least one heading, paragraph, image, and link, and use comments to explain your code.

Question: Identify and list all the HTML tags, elements, and attributes used in the webpage you created.

2. Create a webpage about your favorite movie
Create a webpage about your favorite movie using appropriate HTML tags to structure the content. Include at least one heading, paragraph, image, and link, and use comments to explain your code.

Question: Identify and list all the HTML tags, elements, and attributes used in the webpage you created.

3. Create a webpage about a hobby
Create a webpage about a hobby that you enjoy using appropriate HTML tags to structure the content. Include at least one heading, paragraph, image, and link, and use comments to explain your code.

Question: Identify and list all the HTML tags, elements, and attributes used in the webpage you created.

4. Create a webpage about your favorite book
Create a webpage about your favorite book using appropriate HTML tags to structure the content. Include at least one heading, paragraph, image, and link, and use comments to explain your code.

Question: Identify and list all the HTML tags, elements, and attributes used in the webpage you created.

Happy Coding!

Wednesday, 29 March 2023

HTML hr and br tags


The <hr> and <br> tags are HTML tags used to add horizontal lines and line break, respectively.

The <hr> tag is a self-closing tag that creates a horizontal line, which can be used to visually separate content on a webpage. 

Here's an example of how to use the <hr> tag:

 
<h1>Welcome to my blog</h1>
<hr>

In this example, a horizontal line is inserted between the two paragraphs.

The <br> tag is an HTML tag used to create a line break, which inserts a new line without starting a new paragraph. 

Here's an example of how to use the <br> tag:


<p>This blog is about <br>web development language <br> HTML</p>


In this example, a line break is inserted between the first and second lines, causing them to appear on separate lines. 

The <br> tag is useful for adding short breaks in text, such as between lines of an address or between items in a list. However, it's generally considered better practice to use CSS to control spacing between elements on a webpage, rather than relying on the <br> tag.

It's also important to note that the <br> tag should not be used to separate paragraphs or sections of text, as this can make the content harder to read and less accessible. For that purpose, the <p> tag should be used to create new paragraphs, and CSS can be used to control the spacing between them.


<!DOCTYPE html>
<html>
<head>
<title>Document</title>
</head>
<body>
<h1>Welcome to my blog</h1>
<hr>
<h2>About me</h2>
<p>This blog is about <br>web development language <br> HTML</p>
<hr>
<p>Please <br>Follow</p>
</body>
</html>


output


Practice Time!

  1. Create a simple webpage with a heading, some text, and a horizontal line using the <hr> tag.
  2. Create a webpage with a list of items in paragraph, and use the <br> tag to add line breaks between each item.
  3. Create a webpage with a heading and two sections, separated by a horizontal line. Each section should have some text, and you can use the <br> tag to add line breaks within each section.
  4. Create a webpage with a heading, some text, and multiple horizontal lines.
  5. Create a webpage with a heading, some text, and a line break. Then, use the <hr> tag to add a horizontal line, followed by more text and another line break. Repeat this pattern several times to create a series of sections with horizontal lines separating them.
  6. Create a webpage for a fictional travel agency that includes a header with the agency's name and a navigation menu with links to different destinations. Include a section for each destination with a heading, a paragraph describing the destination, and an image. Use the <hr> tag to separate the sections.
  7. Create a webpage for a blog that includes a header with the blog's name and a navigation menu with links to different categories. Include a section for each category with a heading, a list of blog posts with short descriptions, and an image for each post. Use the <br> tag to separate the posts within each category.
  8. Create a webpage for a fictional online store that includes a header with the store's name and a navigation menu with links to different product categories. Include a section for each category with a heading, a list of products with prices and descriptions, and an image for each product. Use the <hr> tag to separate the sections.
Happy Coding!

Tuesday, 28 March 2023

HTML Links


HTML links, also known as hyperlinks, are used to create clickable text or images that take the user to another webpage, file, or part of the same page.

Here's an example of how to create a hyperlink in HTML:


<a href="https://creative-codz.blogspot.com">Click me to open Blog</a>

In this example, the <a> tag is used to create a hyperlink, and the href attribute specifies the URL that the hyperlink will link to. The text "Click me to open Blog" will be displayed as the hyperlink.

You can also use images as hyperlinks. Here's an example:


<a href="https://creative-codz.blogspot.com"><img src="frozen.jpg" 
            alt="frozen image"></a>

In this example, the <img> tag is used to display the image, and the <a> tag is used to create the hyperlink. The href attribute specifies the URL that the image will link to, and the alt attribute provides alternative text that will be displayed if the image cannot be loaded or read by screen readers.

In addition to using absolute URLs, you can also use relative URLs to link to files or pages within your own website. 

For example:


<a href="headings.html">Click me for headings</a>


The target attribute is used to specify where the linked document should be opened. By default, when a user clicks on a hyperlink, the linked document will open in the same window or tab as the current page. However, you can use the target attribute to open the linked document in a different window or tab.

The target attribute can have the following values:

  • _blank: The linked document will open in a new window or tab.
  • _self: The linked document will open in the same frame as the current page (this is the default behavior).
  • _parent: The linked document will open in the parent frame of the current frame, if it exists.
  • _top: The linked document will open in the full body of the window.

Here's an example:


<a href="https://creative-codz.blogspot.com" target="_blank">
Click here to open in new window</a>

In this example, the href attribute specifies a relative URL that links to the "about.html" file within the same directory as the current page.

You can also add attributes to the <a> tag to control the behavior of the hyperlink, such as opening the linked page in a new window or tab, or linking to a specific part of the same page using an anchor tag.

HTML code for links:


<!DOCTYPE html>
<html>
<head>
<title>HTML Links</title>
</head>
<body>
<h1>HTML Links </h1>
<p>The below link will open the creative codz blog</p>
<a href="https://creative-codz.blogspot.com">Click me to open Blog</a>
<h2>relative URL</h2>
<p>Relative means we can link the pages on the same 
            forder with file name</p>
<a href="headings.html">Click me for headings</a>
<h2>Image as a link</h2>
<p>Whenever we click on the image it will navigate to the blog</p>
<p>Just click on the image</p>
<a href="https://creative-codz.blogspot.com"><img src="frozen.jpg" 
            alt="frozen image"></a>
    <a href="https://creative-codz.blogspot.com" target="_blank">
            Click here to open in new window</a>
</body>
</html>

Output


Practice Time!
  1. Create a webpage that lists your favorite movies. Use headings to separate the movies into different categories (e.g. "Action", "Comedy", "Drama"). Include a paragraph for each movie that describes why you like it, and include an image of the movie poster. Add a comment at the end of the page thanking the user for visiting.

Tips: Use the <h2> element for each category heading, and use the <p> element for each movie description. Use the <img> element to display the movie poster, and the alt attribute to provide alternative text for users who cannot see the image.

  1. Create a webpage about your favorite hobby. Include a heading that says "My Favorite Hobby" and a paragraph that describes why you love this hobby. Include two images that show different aspects of the hobby, and add links to two related websites or resources.

Tips: Use the <h1> element for the page heading, and the <p> element for the hobby description. Use the <img> element to display the images, and the alt attribute to provide alternative text for users who cannot see the images. Use the <a> element to create the links to related websites or resources.

  1. Create a webpage that introduces your company. Include a heading that says "About Our Company" and a paragraph that describes what your company does. Include an image that represents your company, and add links to your social media profiles.

Tips: Use the <h1> element for the page heading, and the <p> element for the company description. Use the <img> element to display the company image, and the alt attribute to provide alternative text for users who cannot see the image. Use the <a> element to create the links to your social media profiles.

4. Create a webpage with a heading that says "My Favorite Recipes". Below the heading, create three paragraphs that describe your favorite dishes. Include an image of each dish and a link to the recipe for each dish.

5. Create a webpage that lists your favorite books. Use headings to separate the books into different categories (e.g. "Fiction", "Non-Fiction", "Memoirs"). Include a paragraph for each book that describes why you like it, and include an image of the book cover. Add a comment at the end of the page thanking the user for visiting.

6. Create a webpage about your favorite travel destination. Include a heading that says "My Favorite Travel Destination" and a paragraph that describes why you love this place. Include two images that show different parts of the destination, and add links to two popular attractions in the area.


Happy Coding!


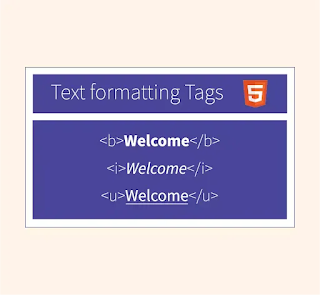
HTML Text Formatting

<i> - This tag is used to italicize text, meaning the text enclosed within <i> tags will be rendered in italic font style. How...